Our house is tiny and we are always in need of curtains that don’t demand too much attention or space. I was visiting a friend’s house recently and she had made ties to hold up a panel-like curtain shade and I thought it was brilliant. I copied her idea and made a faux roman shade for our bathroom. It fit the bill perfectly so I thought I’d share how to make it.
Supplies you will need: Curtain fabric (yardage depends on the size of your window so measure before you buy fabric), 4-6 yards of 3/4″ cotton twill tape, a good iron, sewing machine, thread and a tension curtain rod.
Measure and Cut: Begin by measuring your window. You will essentially be making a panel to fill the window so measure the height of the window and the width but don’t measure any crown molding. Now measure once more…you know what they say about ‘measure twice, cut once!” Write these measurements down because measuring thrice is just silly.
To figure out how much fabric you will want to cut take the measurements you wrote down and add 2 inches to the width and 4.5″ to the length. Cut that out of your fabric.
Next you will want to cut your twill tape. Cut four pieces of twill tape to the length of your window plus 4″.
Start by hemming the sides of your fabric panel. Use your iron to press the long sides of the fabric over one 1/2″ and another 1/2″. Sew both sides.

Repeat with the bottom of your fabric panel folding over one 1/2″ and another 1/2″ and stitching along that fold.
Once the sides and bottom are hemmed, fold over the top of the shade one 1/2″ and another 1.5″ inches down. Press with your iron but don’t sew it just yet. This will create the casing for the curtain rod but before we stitch it closed we need to attach the twill tape ties.
In order to be sure our twill tape doesn’t unravel we need to fold over the ends of the twill tape and sew them shut. Now, this is just the kind of project that can be unnecessarily clumsy and frustrating because making tiny, bulky stitches is never easy. To help us along, however, we will chain stitch the ends of the twill tape.
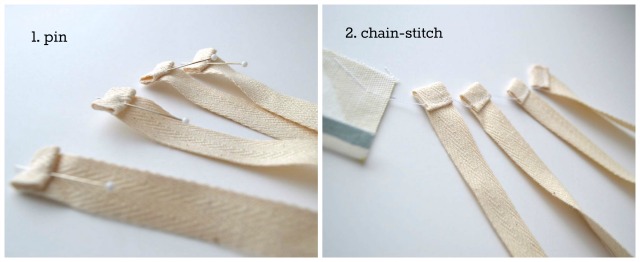
Take each of the 4 twill tape pieces and fold over one of the ends twice. Pin in place. Using a scrap bit of your curtain fabric begin sewing and then once it gets going feed in your twill tape ties, going one at a time until you have sewn them all (see picture above). This helps them feed into the machine much more smoothly. Go ahead and cut them apart from each other. Now you should have four pieces of twill tape that have one end sewn shut and one end raw.
Returning to the fabric panel, tuck the raw end of one of the twill tape ties on the wrong side of the fabric 2″ in from the side hem and pin in place. Repeat on the right-hand side of the curtain top. 
Moving to the right side of the fabric, take another twill tape tie and pin the raw end 2″ in from the side hem with the length of the tie facing the top hem. 
The result will be one twill tape strip pinned to the inside of the fabric panel and one pinned to the outside of the fabric panel. Repeat the same on the right-hand side of the fabric panel.
 Now you can go ahead and stitch along the top hem. Be sure to sew across all of the twill tape ties as you stitch.
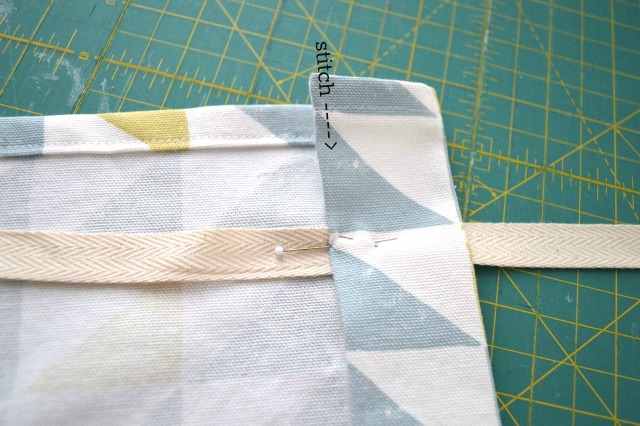
All in one go you will be creating a casing for your curtain rod and securing your twill tape ties. Turn the curtain to the right side and fold the front-side twill tape ties down securing in place with one more stitch to enclose the raw edge.

That’s it! Now you can put the curtain rod through your casing, tie them up to the length you want and admire your beautified house!

xoxo,
Melissa Q.
Melissa Q. blogs at a happy stitch. Catch her over there where she shares her sewing and crafting adventures alongside the occasional parenting adventure/mishap. She is crafter through and through who loves a D-I-Y challenge.


